Common Tasks
This article includes and links to many of the common tasks and useful code examples available, and acts as an abridged version of the full documentation.
Note
- To instead read all the full articles from the beginning, start with the Getting Started article and continue from there.
- You can also view lists of all the different workers and the examples they appear in:
- Non-Dataflow Workers (a.k.a. control flow workers)
- Dataflow:
- Database workers (also included in above lists)
- Also see the Samples article listing the downloadable project examples.
Getting Started
Install or Update Dotnet Templates
Execute this once when there is a new actionETL release (also see here):
dotnet new --install actionETL.templates.dotnet
Create, Build, and Run the Default actionETL Project
Create the default actionETL project and then replace the default license file "my-app\actionetl.license.json" with your license file (also see here):
dotnet new actionetl.console --output my-app
Build and run the new project:
dotnet run --project my-app
Install actionETL in an Existing Project
Update Project for New actionETL Release
Execute in each project folder:
dotnet add package actionETL
Instantiate and Start Worker Systems
For full details, see Worker System.
Start a Worker System async
This is the normal way of invoking actionETL (see Getting Started for details):
using actionETL;
using System.Threading.Tasks;

namespace actionetl.console.csharp
{
    static class Program
    {
        static async Task Main()
        {
            // Create worker system: test if file exists
            var workerSystem = new WorkerSystem()
                .Root(ws =>
                {
                    // Example worker: check filename loaded from "actionetl.aconfig.json"
                    _ = new FileExistsWorker(ws, "File exists", ws.Config["TriggerFile"]);
                });

            // Run the worker system
            var systemOutcomeStatus = await workerSystem.StartAsync().ConfigureAwait(false);

            // Exit with success or failure code
            systemOutcomeStatus.Exit();
        }
    }
}
Start a Worker System Synchronously
In console programs (but not in most other types of applications) you can also start the worker system synchronously, see Worker System.
Check the Outcome of a Worker System
The worker system returns a SystemOutcomeStatus when it completes:
var workerSystem = new WorkerSystem()
    .Root(ws =>
    {
        // ...
    });
var systemOutcomeStatus = await workerSystem.StartAsync().ConfigureAwait(false);
You can inspect it for errors:
if (systemOutcomeStatus.IsFailed)
{
    // ...
}
Or exit the application with a success or failure exit code:
systemOutcomeStatus.Exit();
Or throw on error:
systemOutcomeStatus.ThrowOnFailure();
Configuration
actionETL has a configuration facility for user settings (folder and file names, connection strings, etc.) as well as predefined actionETL settings (dataflow buffer sizes etc, see AConfigSetting for available settings).
File Configuration Settings
Any "actionetl.aconfig.json" configuration file in the execution file folder is loaded by default. See the JSON Configuration File example.
Runtime Configuration Settings
You can set and get settings at runtime, see Set and Get Values at Runtime.
Loading Other Configuration Files
See Load Other Files.
Load License from Non-Default Location
By default the actionETL licenses are read from the "actionetl.license.json" project file.
To instead load them from other files, or from any text string, you can set a configuration, see License Key Location for details.
Logging
The default logging system is NLog, see Logging for full details.
View Log File
By default, all log events are sent to the file "my-application-name.log", and some are also sent to the console.
Here's a logging output example.
Change Logging Level
The default logging level is "Info". To increase logging, in the default project file "nlog.config", find the following file and change "Info" to "Debug" or "Trace":
<logger name="*" minlevel="Info" writeTo="ToFile" />
Debug and especially Trace is normally too verbose for use in production.
Alternatively, you can change the logging level in code:
using NLog;
// ...
LogManager.GlobalThreshold = NLog.Warn;
Instantiate and Group Workers
For full details see Adding and Grouping Workers.
You can also view lists of all the different workers and the examples they appear in:
- Non-Dataflow Workers (a.k.a. control flow workers)
- Dataflow:
- Database workers (also included in above lists)
Also see the Samples article which lists the downloadable project examples.
Instantiate and Group Workers via Callbacks
This example shows the most common way of instantiating and grouping workers (see Specify Work for less common alternatives.)
Important
- Non-dataflow workers and dataflow source workers are always instantiated
with
newand take their parent worker as their first parameter - Dataflow transform and target workers are always instantiated via a factory method,
usually accessed from an output port, e.g.
myUpstreamWorker.Output.Link.AggregateTransform1(/* ... */), and don't take their parent as a parameter - Note that we can often use a fluent coding style and avoid storing the worker instances in variables.
new WorkerSystem()
.Root(root =>
{
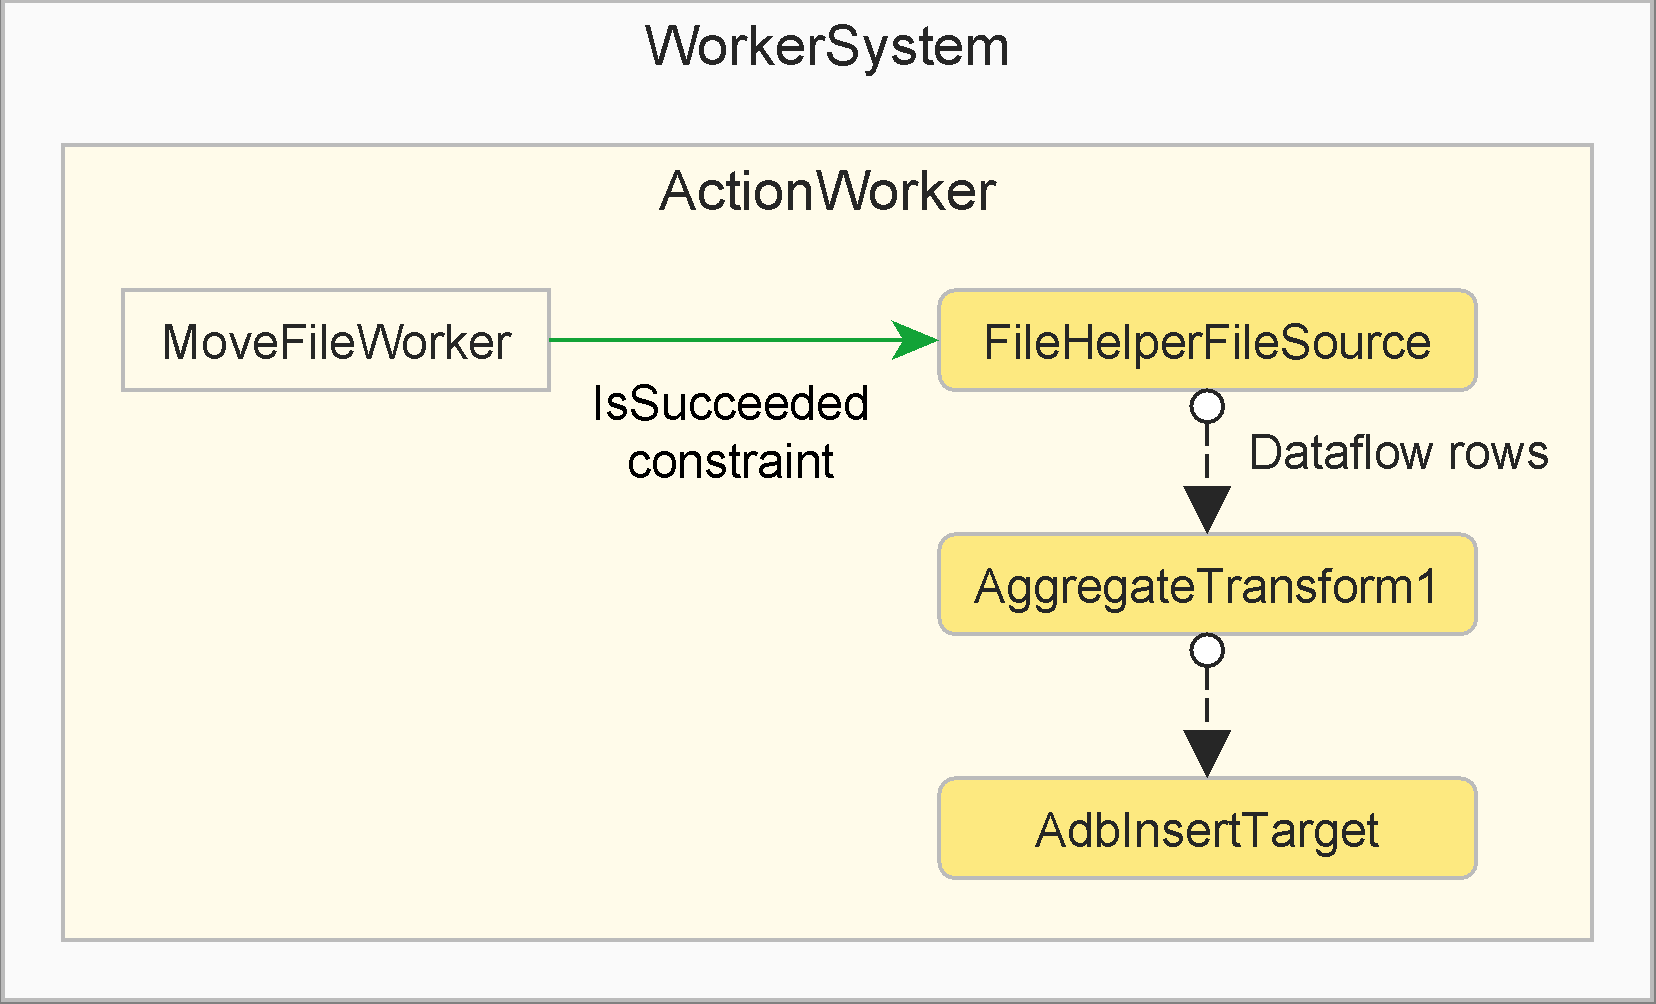
var group = new ActionWorker(root, "Group", aw =>
{
var moveFile = new MoveFileWorker(aw, "Move Source File"
, originalFileName, extractFilename);
_ = new FileHelperFileSource<Category>(aw, "Read CSV"
, () => moveFile.IsSucceeded, extractFilename)
.Output.Link.AggregateTransform1("Last Row", RowAggregationFunction.LastOrNone)
.Output.Link.AdbInsertTarget("Insert"
, provider.CreateConnectionBuilder(root.Config["SqlServer"])
, "dbo.Category");
});
// Other workers, optionally referencing the group worker...
})
.Start()
.ThrowOnFailure();
Instantiate Workers with Helper Method
Avoid duplicating code by creating helper methods that instantiates one or more configured workers, and calling these methods from multiple places in your worker systems.
See this example for details.
Instantiate Workers via Looping
Creating multiple copies of similar workers using a for or foreach loop is often
useful, see this example
for details.
Instantiate Workers via Custom Worker Type
To allow custom worker constructors and properties, and improve encapsulation, create a custom worker type that, when it runs, in turn instantiates child workers.
See Compose Worker Children for details.
Auto Generate Worker Names
All worker siblings (i.e. with the same parent) must have unique names. Use meaningful worker names, since they appear in the log output.
To generate a unique name automatically, do either of:
- Append a
/to the name, (e.g."MyPrefix /"), which will add an increasing number starting at 1 - While less useful, set to
null, whitespace or"/"to generate a unique name from the worker type plus an increasing number starting at 1
The name cannot otherwise contain "/", and also cannot start with double underscore
"__".
Worker Execution
After the user starts the worker system with StartAsync() or Start(), it in turn runs any code that had been added (typically with one of the Root() callback overloads) to the worker system. That code can in turn create workers that will be automatically started, and they can in turn create child workers, etc.
The execution order therefore starts with the worker system, followed by the worker hierarchy from top to bottom, while obeying any added explicit constraints (maximum worker children running and start constraints between workers) as well as implicit dataflow link constraints.
For full details, see the Worker Execution article. It includes:
- Execution Rules
- Start Constraints
- Extension Callbacks
- Status Property
- For additional low-level details, see the Detailed Life-cycle
For more on worker creation, please see the Worker System and Adding and Grouping Workers articles.
Disposing Disposables
If you create an instance of a disposable type, you must ensure it is disposed. In particular, SQL Database Access uses several types that must be disposed. See Disposing Disposables for how to do this within actionETL.
Worker Error Handling
When workers fail, by default the failure gets escalated up the worker hierarchy, thereby also failing all worker ancestors and the worker system. There are two main types of failures:
- Error, which can be suppressed, e.g. to ignore the failure or retry the operation
- Fatal, which cannot be suppressed, and will always fail all ancestors
See Worker Error Handling for full details, including how to modify the default behavior.
Dataflow
For full details, see Dataflow.
Dataflow workers are ordinary workers, but with any number of input and/or
output and error output ports added for very quickly sending data rows between
ETL workers. Each row is a class instance. The dataflow is in-memory and
in-process.
View lists of all the different workers and the examples they appear in:
- Non-Dataflow Workers (a.k.a. control flow workers)
- Dataflow:
- Database workers (also included in above lists)
When dataflow workers are started, all data output ports must be linked to input ports, and vice versa. Furthermore, each output port can only be linked to a single input port, and vice versa. A single worker can however have multiple input ports, and multiple output ports.
Apart from the above data ports, dataflow workers can optionally also have one or more error output ports. They work similarly to data output ports, except that linking to an input port is optional, and they are only used for redirecting rejected rows.
Important
- The most common port property names are
Input,Output, andErrorOutput. - Ports can only be linked between workers that have the same parent.
- Circular dataflows (where the output of a downstream worker is linked to the input of an upstream worker, or to itself) are not allowed.
Please see this dataflow example as well as this port linking example.
Dataflow Rows and Columns
Please review the important concepts of Dataflow Rows and Dataflow Columns.
Dataflow Blocking and Row Buffering
For more complex or large volume dataflow applications, please review Dataflow Blocking and Row Buffering.
Dataflow Column Mapping
Many dataflow workers can map and copy columns and rows when working with ports, e.g. to map a database upstream column to a downstream .NET row class property.
Do review the Dataflow Column Mapping article from the start until just before the "Duplicating Columns" section.
Compare Dataflow Columns
Workers that sort rows or compare them for equality must specify how the rows should be sorted or compared.
Do review the Compare Dataflow Columns article from the start until just before the "Override Other Comparison Members" section.
Dataflow Row Errors
Do review the first section of Dataflow Row Errors to get an overview.
To configure how error rows are logged and/or ignored, see the Logging Only Example.
To perform additional processing on rejected rows, see the Rejecting Examples.
Dataflow Lookups
To perform dictionary lookups, please review the Dataflow Lookups article up until the "Sharing the Dictionary" section, decide which lookup type you need (Fully or Partially Cached and their sub-types), and then see the corresponding example later in the article.
Dataflow Aggregations
To aggregate and group rows and columns, please see the Dataflow Aggregations article.
SQL Database Access
To work with databases, do review the whole SQL Database Access article, including all the database workers, an AdbConnectionBuilder INSERT Example, and an AdbConnectionString SELECT, INSERT and Table Command Example.
Also see the specifics for your particular database in Adb Supported Databases.
To work directly with temporary tables or transactions where the connection must stay open across multiple workers, see the Adb Keep Open Connection article.
To work with database commands and parameters, e.g. to call stored procedures, and to understand database type mapping, see the Adb Commands and Parameters article.
To discover information about a database, its tables etc, see the Adb Information article.
Data Formats
Please see Data Formats for how to process:
Transfer Protocols
The Transfer Protocols article shows how to perform SFTP transfer; the pattern can also be used for other transfer protocols such as SCP, FTP etc.
Troubleshooting and Debugging
See the Troubleshooting article.
Deploy, Run, and Schedule Applications
See the Deploying Applications article.
Custom Workers and Extensions
Beyond the out-of-box workers and facilities, you can also fairly easily create custom workers etc. that looks and operates in the same way as the out-of-box ones.
Custom worker development is described in:
- Custom Workers (which also applies to custom dataflow workers)
- Includes the FileExistsInheritWorker example
- Custom Dataflow Workers
- Also see these larger examples: Process Incoming Files Example and Slowly Changing Dimension Example
- Custom Adb Development describes custom database workers
- Custom Non-Adb Development describes custom database development without any matching Adb database provider available
Apart from the out-of-box Dataflow Aggregations (and groupings), you can also create Custom Dataflow Aggregations.
See Also
- actionETL Overview
- Getting Started
- Worker System
- Workers
- Non-Dataflow Workers (a.k.a. control flow workers)
- Dataflow:
- Dataflow
- SQL Database Access
- Database workers (also included in above lists)
- Data Formats
- Transfer Protocols
- Troubleshooting
- API documentation